
Angular Forms
Một vài thứ mà forms có thể làm:
- Khởi tạo các form fields và hiển thị chúng cho user
- Thu thập dữ liệu từ user
- Theo dõi các thay đổi được thực hiện đối với các field
- Validate the inputs
- Hiện thị các lỗi hữu ích cho user
Angular có 2 cách để xây dựng forms:
| So sánh | Reactive forms | Template-driven forms |
|---|---|---|
| Giống nhau | Cả hai forms đều:
| |
| Logic | Logic của form được đặt trong component như 1 object | Logic của form được đặt trong template |
| Set up form model | Rõ ràng (Explicit), được tạo trong component class => Có thể truy cập trực tiếp vào FormControl instance (form API). | Ngụ ý (implicit), được tạo bởi các directive => Chỉ có thể truy cập FormControl instance thông qua NgModel directive |
| Data model | Có cấu trúc và bất biến (Structured and immutable) | Không có cấu trúc và có thể thay đổi (Unstructured and mutable) |
| Data flow between the view and the data model | Synchronous => Giúp tạo các form lớn và phức tạp dễ dàng hơn | Asynchronous |
| Form validation | Functions | Directives |
| Khả năng mở rộng (Scalability) | Form model được tạo trong component class nên có thể reuse và dễ mở rộng hơn => Phù hợp cho các form quan trọng hoặc ứng dụng sử dụng reactive pattern. | Phù hợp cho các form đơn giản và không thể reuse |
| Testing | Dễ hơn do không yêu thiết lập quá nhiều thứ và cũng không cần hiểu rõ về change detection. | Yêu cầu thiết lập nhiều hơn và phải hiểu rõ về change detection để run manual (thủ công). |
- Template-driven :
- Logic của form được đặt trong template.
- Phù hợp khi muốn tạo các form đơn giản mà không cần phải reuse.
- Quá trình cập nhật thay đổi diễn ra giữa view và component là Asynchronous.
- Sử dụng các directive để validate input fields.
- Reactive forms (còn gọi là model-driven forms):
- Logic của form được đặt trong component như 1 object. Trong component class:
- Tạo form model với Form Groups, Form Controls và Form Arrays.
- Define validation rules: define các custom validator như các function nhận vào control để validate.
- Bind form model và validation rules vào HTML form trong template.
- Quá trình cập nhật thay đổi diễn ra giữa view và component là Synchronous.
- Cách tiếp cận theo hướng model có nhiều lợi ích hơn vì nó được tạo trong comonent class với các Form field như các property của component class.Do đó, nó làm cho việc kiểm tra component dễ dàng hơn.
- Logic của form được đặt trong component như 1 object. Trong component class:
Angular Forms (cả Template-driven và Reactive forms) có 3 khối Building (Building Blocks):
- FormControl
- Đại diện cho 1 input field duy nhất như input,...
- FormControl là một object chứa tất cả thông tin liên quan đến một input element, cho phép bạn điều khiển input element đó như value, validation status,...
- FormGroup: là một tập hợp các FormControl, mỗi FormControl được khai báo như một property của object.
- FormArray: là một mảng (array) các FormControl, mỗi FormControl là một phần tử trong mảng.
Ưu điểm
- Chứa ít code trong component class
- Dễ set up
Nhược điểm
- Khó add dynamic control
- Khó Unit test
Các bước xây dựng Template-driven forms:
- Import FormsModule vào root module (hoặc shared module). FormsModule chứa tất cả các directive form và các cấu trúc để làm việc với forms. FormsModule phải được import nếu bạn muốn sử dụng ngModel.Khi chúng ta import FormsModule, ngForm directive của Angular sẽ tự động tìm tất các các <form> trong HTML template và tự động binding với chính nó.
- Tạo HTML Form
- Export ngForm instance thành một template reference variable (do ngForm directive đã sử dụng exportAs trong Directive Decorator).
<form #contactForm="ngForm">Điều này cho phép chúng ta truy cập các property và method của ngForm qua template reference variable contactFormNhiệm vụ của ngForm:- Binding chính nó với <Form> directive
- Tạo một top-level FormGroup instance
- Tạo FormControl instance cho mỗi field chứa ngModel.
- Tạo FormGroup instance cho mỗi ngModelGroup directive
Ngoài ra, chúng ta cũng có thể export FormControl/FormGroup instance thành template reference variable tương ứng với exportAs: ngModel/ngModelGroup. - Gắn ngModel cho các form field. Bạn cũng có thể cung cấp biến cho ngModel để two-way binding với component.
<input type="text" name="firstname" ngModel>ngModel sẽ sử dụng name attribute để tạo FormControl instance cho mỗi form field được gắn nó.Trong Template-driven forms, chúng ta sử dụng ngModel và ngModelGroup directive trên các HTML element. FormsModule sau đó sẽ tạo các FormControl & FormGroup instance từ template. - Validate form
- Submit form data cho component sử dụng ngSubmit event. Chúng ta sử dụng event binding để bind ngSubmit với onSubmit method in component class
<form #contactForm="ngForm" (ngSubmit)="onSubmit(contactForm)">Khi user click submit button (type="submit"), ngSubmit event sẽ kích hoạt.Chúng ta truyền local template variable contactForm vào onSubmit. contactForm giữ tham chiếu đến ngForm directive, bằng cách này chúng ta có thể truy xuất data form field từ component class.
Get form controls từ forms
@ViewChild('contactForm') contactForm: NgForm;this.contactForm.controls['country'].setValue('vn');this.contactForm.control.get('country').setValue('vn');Demo
Ưu điểm
- Có thể truy cập và tương tác trực tiếp với các form API (FormControl,...)
- Dễ dàng tạo các custom validators bằng cách tạo ra các function nhận vào control.
- Hỗ trợ tạo các dynamic form
- Dễ dàng reuse và mở rộng
- Testing đơn giản hơn so với Template-driven forms.
Nhược điểm
- Cần học nhiều thứ hơn để có thể làm việc với các Reactive forms có logic xử lý phức tạp.
Các bước xây dựng và sử dụng Reactive Forms
- Import ReactiveFormsModule vào root module hoặc shared module - e.g: AppModule;
import { ReactiveFormsModule } from '@angular/forms'; - Tạo Form Model trong component class sử dụng Form Group, Form Control & Form Arrays;
Import FormGroup, FormControl & Validator từ @angular/forms.
import { FormGroup, FormControl, Validators } from '@angular/forms'Tạo FormGroup
contactForm = new FormGroup({})The FormGroup takes 3 arguments. a collection of a child FormControl, a validator - Sync Validator, and an asynchronous validator - Async Validator. The validators are optional.
Tạo FormControl
        contactForm = new FormGroup({
          firstname: new FormControl(),
          lastname: new FormControl(),
          email: new FormControl(),
          gender: new FormControl(),
          isMarried: new FormControl(),
          country: new FormControl()
        })
The FormControl takes 3 arguments. a default value, a validator - Sync Validator, and an asynchronous validator - Async Validator. The validators are optional.
- Tạo HTML Form tương ứng với Form Model trong template.
- Bind HTML Form với Form Model sử dụng [FormGroup] và formControlName.
- Binding the template to the model - set FormGroup directive bằng model (contactFrom defined in component class)
<form [formGroup]="contactForm"> - Binding từng form field element trong form của chúng ta với FormControl models sử dụng FormControlName (formControlName) directive. Note: value được gán cho formControlName tương ứng với FormControl instance đã khai báo trong component class.
<input type="text" id="firstname" name="firstname" formControlName="firstname"><input type="text" id="lastname" name="lastname" formControlName="lastname">
- Binding the template to the model - set FormGroup directive bằng model (contactFrom defined in component class)
- Submit form sử dụng (ngSubmit)Chúng ta sử dụng event binding để bind ngSubmit với onSubmit method in component class:
<form [formGroup]="contactForm" (ngSubmit)="onSubmit()">
Demo
Default Value
firstname= new FormControl('Kenji');firstname: new FormControl({value: 'Kenji', disabled: true}),Có 2 cách để set default value cho forms:
- Set giá trị mặc định cho từng FormControl khi tạo form bằng cách truyền default value vào tham số đầu tiên của FormControl.
firstname: new FormControl('Nguyen'),firstname: [''], - Dùng setValue trong ngOnInit method.
ngOnInit() {
  this.setDefault();
}

setDefault() {
  let contact = {
    firstname: "Sachin",
    lastname: "Tendulkar",
    email: "sachin@gmail.com",
    gender: "male",
    isMarried: true,
    country: "2",
    address: {
      city: "Mumbai",
      street: "Perry Cross Rd",
      pincode: "400050"
    }
  };

  this.reactiveForm.setValue(contact);
}
Note: contact object phải bao gồm tất cả các controls của form và phải chính xác số lượng control (không ít hơn, cũng không được nhiều hơn).
Sync Validator
- The second parameter is an array of sync Validators.
- Sync validators chạy validation và trả về kết quả ngay lập tức.
- Trả về một danh sách errors hoặc null nếu validate thành công.
<form [formGroup]="contactForm" (ngSubmit)="onSubmit()" novalidate>Cách thêm validators cho FormControl
required, pattern and minLength etc. - Required Validator
firstname: new FormControl('', [Validators.required]),Dùng FormBuilder:firstname: ['', [Validators.required]]- Minlength Validator
firstname: new FormControl('', [Validators.required,Validators.minLength(10)]),- Maxlength Validator
lastname: new FormControl('',[Validators.maxLength(15)]),- Pattern Validator
lastname: new FormControl('',[Validators.maxLength(15), Validators.pattern("^[a-zA-Z]+$")]),Chỉ cho phép ký tự chữ và không chứa khoảng trắng.- Email Validator
email:new FormControl('',[Validators.email,Validators.required]),
Disable Submit button
<button type="submit" [disabled]="!contactForm.valid">Submit</button>Displaying the Validation/Error messages
- Component Class
- get firstname() { return this.contactForm.get('firstname'); }
- Template
<div *ngIf="!firstname?.valid && (firstname?.dirty ||firstname?.touched)"> <div [hidden]="!firstname.errors.required"> First Name is required </div> <div [hidden]="!firstname.errors.minlength"> Min Length is 10 </div> </div>- Cách khác:
<div *ngIf="!contactForm.controls.firstname?.valid && (contactForm.controls.firstname?.dirty ||contactForm.controls.firstname?.touched)"> First Name is not valid </div>
Demo
Bảng ký tự đặc biệt dùng với biểu thức chính quy (regular expression)
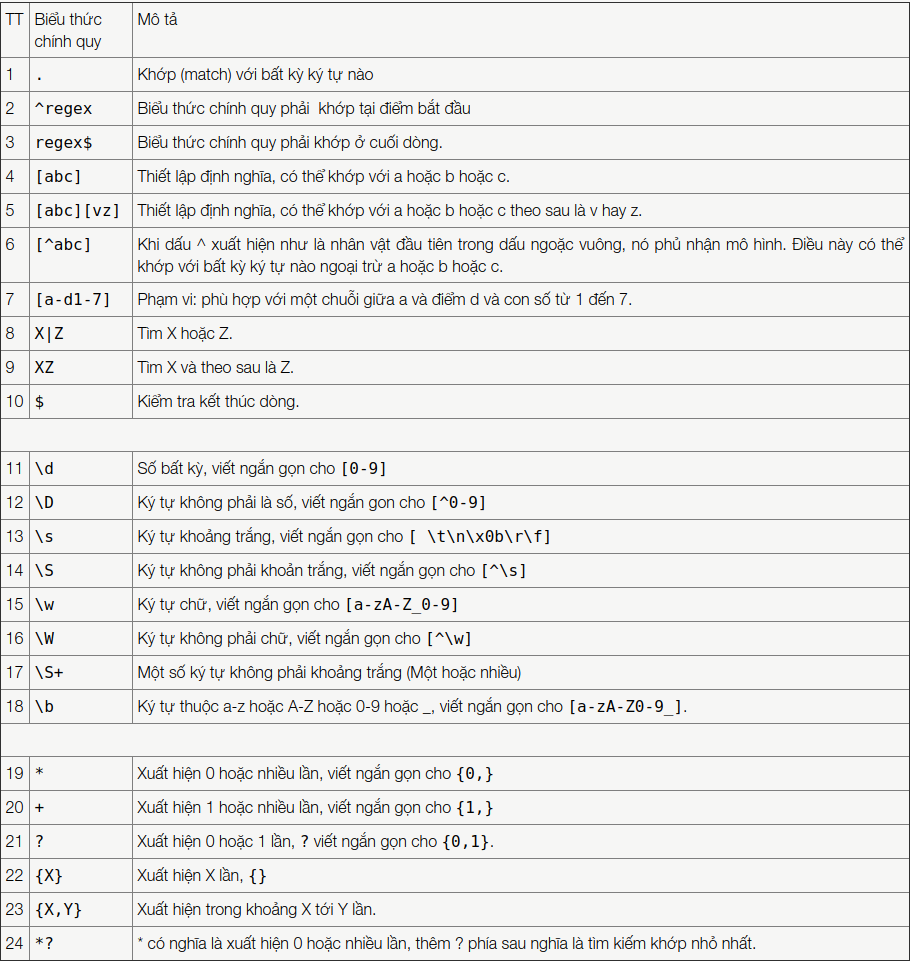 Link
LinkAsynchronous validator
- The third argument is the Async Validator. The syntax of Async Validators is similar to Sync Validators.
- Async validators trả về một Promise hoặc Observable. Đây là điểm khác biệt so với sync validator.
Cách tạo custom Async Validator
- Tạo function implement AsyncValidatorFn Interface. interface AsyncValidatorFn { (control: AbstractControl): Promise<ValidationErrors | null> | Observable<ValidationErrors | null> }
- Function phải trả về ValidationErrors | null dưới dạng Promise hoặc Observable. import { AbstractControl, ValidationErrors } from '@angular/forms' import { Observable, of } from 'rxjs'; export function gte(control: AbstractControl): Observable<ValidationErrors> | null { const v:number=+control.value; if (...) { // Add validation logic return of({ 'gte': true, 'requiredValue': 10 }); } return of(null); }
Example
import { AbstractControl, ValidationErrors } from '@angular/forms'
import { Observable, pipe } from 'rxjs';
import { map, debounceTime } from 'rxjs/operators';

export function validate(control: AbstractControl): Observable<ValidationErrors> | null {
  const value: string = control.value;

  return this.http.get(this.baseURL + 'checkIfValid/?value=' + value)
    .pipe(
      debounceTime(500),
      map( (data:any) =>  {
          if (!data.isValid) return ({ 'InValid': true })
      })
    )

}Grouping the controls using FormGroup
      contactForm = new FormGroup({
        ...,
        country: new FormControl(),
        address:new FormGroup({
          city: new FormControl(),
          street: new FormControl(),
          pincode:new FormControl()
        })
      })
<div formGroupName="address">Sử dụng FormBuilder để build Forms
FormBuilder là API hỗ trợ xây dựng các reactive form trong Angular một cách đơn giản hơn. Nó cung cấp một syntax ngắn gọn hơn để tạo instance của FormControl, FormGroup, các FormGroup lồng nhau, hoặc FormArray => Giúp chúng ta giảm code required để viết các forms phức tạp.
Cách sử dụng FormBuilder
- Import & inject FormBuilder API vào component
import { FormBuilder } from '@angular/forms'constructor(private formBuilder: FormBuilder) - Use the group, array & control methods to build the FormModel:
FormGroup
              this.contactForm = this.formBuilder.group({
                firstname: [''],
                lastname: [''],
                email: [''],
                gender: [''],
                isMarried: [''],
                country: [''],
              });
Nested FormGroup
            this.contactForm = this.formBuilder.group({
              ...,
              country: [''],
              address: this.formBuilder.group({
                city: [''],
                street: [''],
                pincode: ['']
              })
            })
Validations
The second argument to the FormControl is the list of sync validators.this.contactForm = this.formBuilder.group({ firstname: ['', [Validators.required, Validators.minLength(10)]], lastname: ['', [Validators.required, Validators.maxLength(15), Validators.pattern("^[a-zA-Z]+$")]], email: ['', [Validators.required, Validators.email]], gender: ['', [Validators.required]], isMarried: ['', [Validators.required]], country: ['', [Validators.required]], address: this.formBuilder.group({ city: ['', [Validators.required]], street: ['', [Validators.required]], pincode: ['', [Validators.required]], }) });
Demo
setValue
setValue(value: { [key: string]: any; }, options: { onlySelf?: boolean; emitEvent?: boolean; } = {}): void- Khi sử dụng setValue để update, object truyền vào phải match chính xác với cấu trúc FormGroup hoặc FormArray đã tạo - object phải bao gồm tất cả form control của form (chính xác số lượng controls của form - không hơn, không kém), nếu không, chúng ta sẽ gặp lỗi.
- Chúng ta thường dùng setValue để set default values và giá trị của một form control cụ thể.
patchValue
patchValue(value: { [key: string]: any; }, options: { onlySelf?: boolean; emitEvent?: boolean; } = {}): voidonlySelf
- Giá trị mặc định của onlySelf là false ➞ Khi setValue của một form control nào đó, Angular sẽ check validation của form control đó. Sau đó, nó sẽ gửi kết quả validation của control này lên top-level FormGroup. Do đó, validation status của FormGroup trước và sau setValue có thể bị thay đổi.
- Nếu set giá trị onlySelf: true ➞ Angular sẽ chỉ check validation của form control thực hiện setValue, không check lại validation của form control khác, và cũng không gửi kết quả validation của form control đó đến parent form group. Do đó, validation status của FormGroup trước và sau setValue không thay đổi. ➤ Do đó, khi onlySelf: true - StatusChanges và ValueChanges chỉ kích hoạt với controls được chỉ định, không kích hoạt với form.
emitEvent
- Mặc định, emitEvent: true ➞ Kích hoạt ValueChanges và StatusChanges.
- Nếu emitEvent: false ➞ sẽ stop hành vi mặc định của ValueChanges và StatusChanges event. Không kích hoạt ValueChanges và StatusChanges.
Cách get form controls từ FormGroup
contactForm: FormGroup;this.reactiveForm.get("firstname");this.reactiveForm.get("firstname").setValue("");StatusChanges
- StatusChanges được kích hoạt mỗi khi Angular validate FormControl/FormGroup/FormArray.
- StatusChanges trả về một Observable emit latest validation status của control, do đó, chúng ta có thể subscribe nó để lấy validation status mới nhất của control hoặc form.
- Validation status của control hoặc form là một trong 2 giá trị: VALID hoặc INVALID.
Quá trình kích hoạt StatusChanges của controls và form
- Thay đổi giá trị của input FormControl ⇒ Angular chạy validation để check input FormControl.
- Nếu validation tạo một list các validation error, status => INVALID. Nếu không có error, status => VALID.
- Kích hoạt StatusChanges của FormControl: this.reactiveForm.get("firstname").statusChanges.subscribe(newStatus=> { console.log(newStatus) //latest status console.log(this.reactiveForm.get("firstname").status) //latest status console.log(this.reactiveForm.status) //Previous status // waiting for the next tick setTimeout(() => { console.log(this.reactiveForm.status) //latest status }) })Note: Lúc này, status của control là mới nhất, NHƯNG status của parent form vẫn giữ status trước đó.
- Truyền validation status của control lên parent form => Angular update lại validation status của parent form và return VALID hoặc INVALID.
- Kích hoạt StatusChanges của cả FormGroup this.reactiveForm.statusChanges.subscribe(newStaus => { console.log('form Status changed event') console.log(newStaus) })
- Sau khi chạy xong StatusChanges của parent FormGroup, nếu trước đó chúng ta có sử dụng setTimeout bên trong StatusChanges của control thì nó sẽ run callback của setTimeout.
emitEvent & StatusChanges
this.reactiveForm.get("firstname").setValue("", { emitEvent: false });onlySelf & StatusChanges
this.reactiveForm.get("firstname").setValue("", { onlySelf: true });Demo
ValueChanges
- ValueChanges được kích hoạt bất cứ khi nào value của FormControl/FormGroup/FormArray thay đổi.
- ValueChanges return về một Observable, do đó, chúng ta có thể subscribe nó để lấy value mới nhất của control.
- Nó cho phép chúng track changes value in real-time và phản hồi lại nó. Do đó, chúng ta có thể sử dụng nó để validate value, tính toán, so sánh các field/control.
Subscribe ValueChanges
- Với FormControl: this.contactForm .get('firstname') .valueChanges.subscribe((selectedValue) => { console.log('firstname value changed'); console.log(selectedValue); //latest value of firstname console.log(this.contactForm.get('firstname').value); //latest value of firstname console.log(this.contactForm.value); //still shows the old first name });Note 1: valueChangesevent cho firstname được kích hoạt ngay lập tức sau khi new value được update NHƯNG trước khi thay đổi này được chuyển lên cho parent của nó. Do đó, this.contactForm.value vẫn giữ giá trị trước đó.Note 2: Ta có thể lấy giá trị mới nhất của this.contactForm.value bằng cách lấy nó trong callback của setTimeout. Callback của setTimeout lúc này sẽ nằm trong Callback Queue cho đến khi, Angular truyền thay đổi lên parent (FormGroup), update value của Form. Sau đó, Call Stack trống, callback của setTimeout trong callback queue sẽ được đưa vào Call Stack và thực thi.this.contactForm .get('firstname') .valueChanges.subscribe((selectedValue) => { console.log('firstname value changed'); console.log(selectedValue); //latest value of firstname console.log(this.contactForm.get('firstname').value); //latest value of firstname console.log(this.contactForm.value); //still shows the old first name setTimeout(() => { console.log(this.contactForm.value); //shows the latest first name }); });
- Với FormGroup: this.contactForm.valueChanges.subscribe((objectValue) => { console.log('form value changed'); console.log(objectValue); });
EmitEvent & ValueChanges
Nếu chúng ta set value sử dụng option emitEvent: false thì ValueChanges sẽ không được kích hoạt.
this.contactForm.get("firstname").setValue("", { emitEvent: false });Chúng ta có thể sử dụng emitEvent: false với setValue, patchValue, markAsPending, disable, enable, updateValueAndValidity & setErrors methods.
OnlySelf & ValueChanges
Khi onlySelf: true các thay đổi chỉ ảnh hưởng đến FormControl đang thực hiện thay đổi và các thay đổi không được truyền cho parents của nó. Do đó, ValueChanges của parent FormGroup không được kích hoạt ⇒ Chỉ kích hoạt ValueChanges của FormControl đang thực hiện thay đổi.
this.contactForm.get("firstname").setValue("", { onlySelf: true });Chúng ta có thể sử dụng onlySelf: true với setValue, patchValue, markAsUntouched, markAsDirty, markAsPristine, markAsPending, disable, enable, and updateValueAndValidity methods.
Demo
Tài liệu tham khảo:
FormControl
FormControl là một trong 3 building block của angular forms, được dùng để thiết lập và theo dõi (value và validation status) một input element riêng lẻ.
<input type="text" name="firstname" />Các cách sử dụng FormControl
- Setting the value
- setValue()
abstract setValue(value: any, options?: Object): voidthis.reactiveForm.get("email").setValue("sachin.tendulakar@gmail.com");- patchValue()
abstract patchValue(value: any, options?: Object): voidthis.reactiveForm.get("email").setValue("sachin.tendulakar@gmail.com");
- Getting the current value - Readonly
- Sử dung get() method
get()
this.reactiveForm.get("firstname").value- valueChanges
valueChanges: Observable<any>
this.fNameChange = this.reactiveForm.get("firstname").valueChanges.subscribe(x => {
   console.log(x);
})
- Control validation status
status
status: VALID | INVALID | PENDING | DISABLEDthis.reactiveForm.get("firstname").statusvalid
valid: booleanthis.reactiveForm.get("firstname").validinvalid
invalid: booleanthis.reactiveForm.get("firstname").invalidpending - đang validation check
pending: booleanthis.reactiveForm.get("firstname").pendingdisabled
disabled: booleanthis.reactiveForm.get("firstname").disabledenabled
enabled: booleanthis.reactiveForm.get("firstname").enabledpristine - TRUE - nếu người dùng chưa thay đổi giá trị trong UI
pristine: booleanthis.reactiveForm.get("firstname").pristinedirty - TRUE - nếu người dùng đã thay đổi giá trị trong UI
dirty: booleanthis.reactiveForm.get("firstname").dirtytouched - TRUE - Nếu đã trigger một blur event
touched: booleanthis.reactiveForm.get("firstname").toucheduntouched - TRUE - Nếu chưa trigger một blur event
untouched: booleanthis.reactiveForm.get("firstname").untouched
- Changing the Status
- markAsTouched
markAsTouched(opts: { onlySelf?: boolean; } = {}): void
this.reactiveForm.get("firstname").markAsTouched()this.reactiveForm.get("firstname").markAsTouched({ onlySelf:true; })- markAllAsTouched
markAllAsTouched(): void
Đánh dấu control và tất cả các children control của nó là touched.- markAsUntouched
markAsUntouched(opts: { onlySelf?: boolean; } = {}): void
onlySelf: true - Chỉ đánh dấu control, không đánh dấu children của nó.- markAsDirty - Đánh dấu đã thay đổi value
markAsDirty(opts: { onlySelf?: boolean; } = {}): void
onlySelf: true - Chỉ đánh dấu control, không đánh dấu children của nó.- markAsPristine - Đánh dấu chưa thay đổi value
markAsPristine(opts: { onlySelf?: boolean; } = {}): void
onlySelf: true - Chỉ đánh dấu control, không đánh dấu children của nó.- markAsPending - Dùng trong lúc chúng ta custom validation check để đánh dấu PENDING trong lúc đang validate và chưa xong.
markAsPending(opts: { onlySelf?: boolean; emitEvent?: boolean; } = {}): void
onlySelf: true - Chỉ đánh dấu control, không đánh dấu children của nó.emitEvent: true hoặc không truyền - Sẽ kích hoạt statusChanges.- disable - Disables the control. Dùng khi custom validators hoặc valueChanges.
disable(opts: { onlySelf?: boolean; emitEvent?: boolean; } = {}): void
onlySelf: true - Chỉ đánh dấu control, không đánh dấu children của nó.emitEvent: true hoặc không truyền - Sẽ kích hoạt cả statusChanges và valueChanges.- enable - Enables control. Dùng khi custom validators hoặc valueChanges.
disable(opts: { onlySelf?: boolean; emitEvent?: boolean; } = {}): void
onlySelf: true - Chỉ đánh dấu control, không đánh dấu children của nó.emitEvent: true hoặc không truyền - Sẽ kích hoạt cả statusChanges và valueChanges.
- StautsChanges Event
statusChanges: Observable<any> - updateValueAndValidity() - Bắt buộc form thực thi validation. Điều này hữu ích khi bạn thêm / xóa validators dynamically bằng cách sử dụng setValidators, RemoveValidators, v.v.
updateValueAndValidity(opts: { onlySelf?: boolean; emitEvent?: boolean; } = {}): voidthis.reactiveForm.get("firstname").updateValueAndValidity();onlySelf: true - Chỉ update control, không update children của nó.emitEvent: true hoặc không truyền - Sẽ kích hoạt cả statusChanges và valueChanges. - setValidators() / setAsyncValidators() adds the sync or async validators. Phương pháp này sẽ remove tất cả các sync hoặc async validators đã thêm trước đó.
setValidators(newValidator: ValidatorFn | ValidatorFn[]): voidsetAsyncValidators(newValidator: AsyncValidatorFn | AsyncValidatorFn[]): voidsetValidator() { this.reactiveForm.get("firstname").setValidators([Validators.required, Validators.minLength(5)]); this.reactiveForm.get("firstname").updateValueAndValidity(); } - clearValidators() / clearAsyncValidators() Clear tất cả các sync/async validators.
clearValidators(): voidclearAsyncValidators(): voidclearValidation() { this.reactiveForm.get("firstname").clearValidators(); this.reactiveForm.get("firstname").updateValueAndValidity(); } - errors() Một object chứa bất kỳ errors nào được tạo ra do không validate được hoặc null nếu không có lỗi.
errors: ValidationErrors | nullgetErrors() { const controlErrors: ValidationErrors = this.reactiveForm.get("firstname").errors; if (controlErrors) { Object.keys(controlErrors).forEach(keyError => { console.log("firtname "+ ' '+keyError); }); } } - setErrors()
setErrors(errors: ValidationErrors, opts: { emitEvent?: boolean; } = {}): voidsetErrors() { this.reactiveForm.get("firstname").setErrors( {customerror:'custom error'}); } - getError() - Reports error data for the control with the given path.
getError(errorCode: string, path?: string | (string | number)[]): anythis.reactiveForm.getError("firstname")this.reactiveForm.getError("address.pincode");this.reactiveForm.getError(["address","pincode"]); - hasError() - Reports whether the control with the given path has the error specified.
hasError(errorCode: string, path?: string | (string | number)[]): booleanthis.reactiveForm.hasError("firstname");this.reactiveForm.hasError("address.pincode");this.reactiveForm.hasError(["address","pincode"]); - reset() - Resets the control. We can also pass the default value.
abstract reset(value?: any, options?: Object): voidthis.reactiveForm.get("firstname").reset('');this.reactiveForm.get("firstname").reset('test');
Tài liệu tham khảo:
FormGroup
- FormGroup là một tập hợp nhiều FormControl.
- FormGroup cũng là một trong 3 building blocks của Angular forms.
- FormGroup theo dõi value và validation status của một nhóm các FormControl.
<form>


First Name : <input type="text" name="firstname" />
  Last Name  : <input type="text" name="lastname" />
  Email      : <input type="text" name="email" />
</form>- FormGroup hữu ích khi chúng ta muốn check validation, set value hoặc lắng change event,... cho nhiều FormControl.
- FormGroup tổng hợp value của từng FormControl thành một object với control name như một key của object.
- Validation status của FormGroup được thực hiện bằng cách reduce validation status value của tất cả các FormControl của nó. Do đó, nếu một control trong group invalid thì validation status của group sẽ là invalid.
Adding Controls Dynamically to Form Group
- addControl() - Thêm một control vào FormGroup và cũng update validity & validation status. Nếu control đã tồn tại, nó sẽ bị bỏ qua (ignore).
addControl(name: string, control: AbstractControl): voidaddControl() { this.middleName = new FormControl('', [Validators.required]); this.reactiveForm.addControl("middleName",this.middleName); }- registerControl() - Thêm một control vào FormGroup và nhưng không update validity & validation status. Nếu control đã tồn tại, nó sẽ bị bỏ qua (ignore).
registerControl(name: string, control: AbstractControl): AbstractControlregisterControl() { this.middleName = new FormControl('', [Validators.required]); this.reactiveForm.addControl("middleName",this.middleName); }- removeControl() - Xóa một control khỏi FormGroup.
removeControl(name: string): voidremodeControl() { this.reactiveForm.removeControl("middleName"); }- setControl() - Thay thế một control có name được cung cấp bằng một FormControl mới.
setControl(name: string, control: AbstractControl): voidsetControl() { this.middleName = new FormControl('test', [Validators.required]); this.reactiveForm.setControl("middleName",this.middleName); }- contains() - Kiểm tra control với tên được cung cấp có tồn tại trong FormGroup hay không.
contains(controlName: string): booleancontainsControl() { console.log(this.reactiveForm.contains("middleName")); }
Tài liệu tham khảo
FormArray
FormArray cũng là một cách để nhóm các FormControl nhưng theo dạng mảng. Thường được dùng để tạo form dạng table.
FormArray cho phép chúng ta add controls dynamically.
Cách tạo và submit một FormArray
- Import FormArray từ @angular/forms
import { FormGroup, FormControl,FormArray, FormBuilder } from '@angular/forms' - Tạo Form Model skillsForm: FormGroup; constructor(private fb:FormBuilder) { this.skillsForm = this.fb.group({ name: '', skills: this.fb.array([]) , }); }
- Dùng getter method để get skills FormArray get skills() : FormArray { return this.skillsForm.get("skills") as FormArray }
- Viết 1 function return về 1 phần tử của skills FormArray newSkill(): FormGroup { return this.fb.group({ skill: '', exp: '', }) }
- Viết 1 function để dynamic add 1 phần tử vào skills FormArray bằng push method addSkills() { this.skills.push(this.newSkill()); }
- Viết 1 function để dynamic remove 1 phần tử ra khỏi skills FormArray bằng removeAt method removeSkill(i:number) { this.skills.removeAt(i); }
- Viết 1 function để submit form onSubmit() { console.log(this.skillsForm.value); }
- Tạo Form template
- Binding skills FormArray (name của FormArray) cho formArrayName
- Bây giờ, div và mọi thứ bên trong div element được liên kết với skills FormArray.
<div formArrayName="skills"></div> - Bên trong div sử dụng ngFor để lặp qua từng phần tử của skills FormArray
<div formArrayName="skills"> <div *ngFor="let skill of skills.controls; let i=index"> </div> </div>- Final template
- Skills: <div formArrayName="skills"> <div *ngFor="let skill of skills.controls; let i=index"> <div [formGroupName]="i"> {{i}} skill name : <input type="text" formControlName="skill"> exp: <input type="text" formControlName="exp"> <button (click)="removeSkill(i)">Remove</button> </div> </div> </div>
Demo
Tài liệu tham khảo
Custom Validator
Built-in validators không thể cover hết tất cả các case trong quá trình chúng ta làm việc với form. Do đó, chúng ta có thể tạo ra một custom validator để sử dụng logic riêng của mình.
Cách tạo một custom validator
Validator là một function implement ValidatorFn interface. Nó nhận vào AbstractControl và trả về ValidationErrors object hoặc null.
- ValidatorFn
- interface ValidatorFn { (control: AbstractControl): ValidationErrors | null }
- AbstractControl là base class cho FormControl, FormGroup và FormArray.
- Example
- export function gte(control: AbstractControl): ValidationErrors | null { const v:number=+control.value; // Get value from control if (...) { // Add logic here return { 'gte': true, 'requiredValue': 10 } } return null }
- ValidationErrors là một object key-value kiểu [key: string]: bất kỳ và nó xác định quy tắc bị hỏng. key là string và phải chứa tên của quy tắc bị hỏng (nên lấy tên validator function). Giá trị có thể là bất kỳ giá trị nào, nhưng thường được đặt thành true.
return { 'gte': true, 'requiredValue': 10 }
Tạo Custom Validator nhận thêm tham số đầu vào
Bởi vì validator phải implement ValidatorFn Interface và ValidatorFn chỉ nhận một tham số i.e control: AbstractControl. Do đó, để truyền tham số cho custom validator, chúng ta cần tạo function nhận vào các tham số chúng ta muốn và phải trả về ValidatorFn function (function này nhận vào control: AbstractControl và trả về ValidationErrors | null) - A factory function.
export function gte(val: number): ValidatorFn {

  return (control: AbstractControl): ValidationErrors | null => {
    let v: number = +control.value; // Get value from control

    if (...) {
      // Add validation logic
      return { 'gte': true, 'requiredValue': val }
    }

    return null;
  }
}